It all started with a Michael Miller mini charm pack of Cotton Couture solids in my QuiltCon 2015 swag bag and inspiration from a quilt hanging in my local quilt shop made from
Denyse Schmidt's pattern, Big Charming. I named this mini quilt, Sew Charmed and here is it hanging on the barn one fall afternoon of October 2015.
 |
| Sew Charmed by Paige Alexander |
The Michael Miller mini charm pack received in the QuiltCon 2015 swag bag below.
 |
| Michael Miller Cotton Couture mini charm pack |
And you might think I'm crazy, but here are the mini charms fresh out of the dryer. I'm a prewasher and don't want any surprises down the road.
 |
| Cotton Couture mini charms out of the dryer |
I pressed them and started laying them out on the design wall.
 |
| First layout of Cotton Couture mini charm squares |
Then another layout going from warm to cool colors.
 |
| Second layout of Cotton Couture mini charm squares |
Final layout after trimming to a consistent size, I think 2 1/8".
 |
| Cotton Couture mini charm squares after trimming |
Next, I had to decide on a background. I auditioned various fabrics by pinning to the design wall and stepping back to take a look. Notice the Hoffman modern batik on the left that I ordered soon after they were on the market and
mentioned in this post.
A few more auditions. I decided on the fabric at the top. I only had a 1/2 yard and knew it was a Windam fabric. But after
posting it on Instagram, Yvonne at
Quilting Jetgirl quickly identified it for me and I ordered what I needed from
Warm Kitty Quilts on Etsy.
The finished top measuring approximately 27" x 20".
 |
| Sew Charmed quilt top by Paige Alexander |
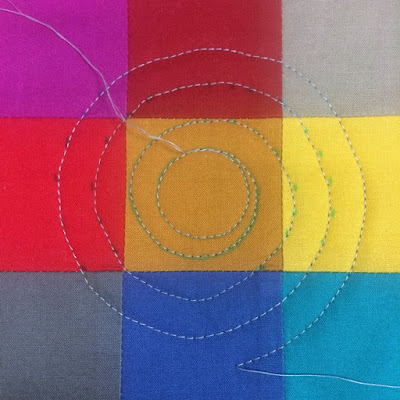
Now...how to quilt it. I first thought about spiral quilting starting from the center charm and used a quarter at the start of the first circle.
I drew the outline of the quarter and then gradually increased the spacing until the lines were about 1/2" apart. From there I thought I could use the edge of the walking foot as a guide to finish the quilting. But I just wasn't happy. The curves were not smooth and I decided to rip it out.
 |
| Spiral quilting ultimately ripped out |
I decided to go with uneven concentric circles. And yes, that entailed burying the starts and stops of each circle. I found a
scrap booking circle template at the thrift store and used it to draw the circles. Sometimes I used a previously stitched line and the edge of my walking foot as a guide for the next line.
 |
| Sew Charmed under the machine |
Now the quilting is finished and I'm about to dunk it in the washing machine to remove the blue water soluble marking lines.
 |
| Sew charmed before soaking to remove the markings |
My favorite binding is double fold bias and liked the way it contrasted with vertical and horizontal gridded lines in the background fabric.
 |
| Sew Charmed by Paige Alexander |
Another view on the barn...
 |
| Sew Charmed by Paige Alexander on the barn |
And a view on the gate where you can see a little of the fall color.
 |
| Sew Charmed by Paige Alexander hanging on the gate |
Quilt Stats:
- Finished size: 27" x 20"
- Pattern: Inspired by Big Charming by Denyse Schmidt
- Binding: 1/4" double fold bias binding from 2" strips and sewn down by hand
- Fabrics: Michael Miller Cotton Couture mini charm squares; background: Grid by Bye Bye Birdie from Windham Fabrics
- Thread: Aurifil for piecing and quilting
- Batting: 100% Cotton Warm & White by the Warm Company
- Completed: October 30, 2015
Sew Charmed was a fun little quilt to make. So far, it has been my most liked
picture on Instagram and
most viewed on Flickr.
I didn't go back too far back in my quilty past to show you this one and am linking to
Throwback Thursday with Jen at
A Quarter Inch from the Edge.


Hooray for reverse image search in Google Images! I'm glad I could help you find the material you needed; this is a very fun quilt and I enjoyed getting to know more of its story.
ReplyDeleteWhat a contemporary and colorful quilt. I love it.
ReplyDeleteI love this quilt Paige. I can see why it is so popular on instagram. I have some 5 inch charms that would look wonderful in a larger version. This is making me think. You did a really good job with the quilting and I'm glad to see the washable maker washed out.
ReplyDeleteRecently I experienced a "surprise" and now I've become a pre-washer as well. Great background choice here and I really love how you quilted this. I'm also a fan of the bias binding decision. Gee, I guess it's not surprising this quilt has lots of views!
ReplyDeleteIt is absolutely lovely Paige. I love the background fabric, and a great mix of focal squares. You nailed the concentric circles and like Lisa, I'd love to make a slightly bigger one. Thank you for sharing
ReplyDeleteThis quilt makes me fall instantly in love with it Paige. Every detail of your design decisions and stitching is so perfectly done! I really love the warm to cool layout of the squares and the way you quilted concentric rings instead of spirals.
ReplyDeleteI had to smile, because I'm a dedicated prewasher and I wash charm packs too. It's amazing how differently each fabric shrinks, even in the same collection. I don't want that happening in my final quilt either. I just prewashed a few jelly roll strips yesterday, but I wouldn't want to untangle a hole roll of them. Do you ever attempt prewashing 2.5" strips?
What a pretty quilt! It really makes me want to try something similar. Those circles are just perfect!
ReplyDeleteThis comment has been removed by the author.
ReplyDeleteArranging the colors by temperature is such a fantastic idea! I never would have thought of doing that. This is and excellent use of swag bag goodies!! :)
ReplyDeletePaige, thanks for sharing the story behind this charming little quilt. I am a prewasher, also, but I confess that I don't usually wash charm squares. I love the way your bias binding looks in this crosshatch fabric!
ReplyDeleteThis is such a neat little quilt! And I enjoyed watching the process...thanks for sharing with us!
ReplyDeleteI love circular quilting. Such a beautiful quilt, Paige!!
ReplyDelete-Soma
Yvonne saves the day! Glad she was able to help you identify the background fabric because it was the perfect fabric for this mini. I love the circle quilting as well, I love how it contrasts the sharp lines of the squares. Beautiful mini, Paige!
ReplyDeleteI was searching pinterest the other day for ideas for a mini quilt and this one popped p and grabbed my attention. I had no idea it was yours Paige. I love the circles you quilted, it provides so much interesting movement to the quilt. I cant wait to find the perfect project to try quilting circles, I love the look of them. This is a wonderful quilt!
ReplyDeleteNow that's a first for me seeing all those washed mini charms. Did you wash them in a lingerie bag? I'm consistently a prewasher, and maybe that's why I've stayed away from precuts for the most part all these years. That really worked out for you! I love the quilt in the sunshine with that quarter sized circle jumping right off the center of the pieced square.
ReplyDeleteIt's really such an eye-catching picture! And when you loom close up at the detail, it's even greater - the bias binding touch is an exquisite detail. Must try circular quilting one day...
ReplyDeleteI too love circular quilting. Actually need to get back to a small quilt I started a couple of years ago with concentric circles and then didn't finish. I'm also considering spiral quilting for a QuiltCon entry but haven't tried that yet. I understand the beginning can be a challenge.
ReplyDeleteThis is far and away the most modern quilt linked up with TBT... perhaps ever! I love the quilting and the negative space. Lovely! Thanks for linking up with Throwback Thursday @ A Quarter Inch from the Edge!
ReplyDelete