It all started with a Michael Miller mini charm pack of Cotton Couture solids in my QuiltCon 2015 swag bag and inspiration from a quilt hanging in my local quilt shop made from
Denyse Schmidt's pattern, Big Charming. I named this mini quilt, Sew Charmed and here is it hanging on the barn one fall afternoon of October 2015.
 |
| Sew Charmed by Paige Alexander |
The Michael Miller mini charm pack received in the QuiltCon 2015 swag bag below.
 |
| Michael Miller Cotton Couture mini charm pack |
And you might think I'm crazy, but here are the mini charms fresh out of the dryer. I'm a prewasher and don't want any surprises down the road.
 |
| Cotton Couture mini charms out of the dryer |
I pressed them and started laying them out on the design wall.
 |
| First layout of Cotton Couture mini charm squares |
Then another layout going from warm to cool colors.
 |
| Second layout of Cotton Couture mini charm squares |
Final layout after trimming to a consistent size, I think 2 1/8".
 |
| Cotton Couture mini charm squares after trimming |
Next, I had to decide on a background. I auditioned various fabrics by pinning to the design wall and stepping back to take a look. Notice the Hoffman modern batik on the left that I ordered soon after they were on the market and
mentioned in this post.
A few more auditions. I decided on the fabric at the top. I only had a 1/2 yard and knew it was a Windam fabric. But after
posting it on Instagram, Yvonne at
Quilting Jetgirl quickly identified it for me and I ordered what I needed from
Warm Kitty Quilts on Etsy.
The finished top measuring approximately 27" x 20".
 |
| Sew Charmed quilt top by Paige Alexander |
Now...how to quilt it. I first thought about spiral quilting starting from the center charm and used a quarter at the start of the first circle.
I drew the outline of the quarter and then gradually increased the spacing until the lines were about 1/2" apart. From there I thought I could use the edge of the walking foot as a guide to finish the quilting. But I just wasn't happy. The curves were not smooth and I decided to rip it out.
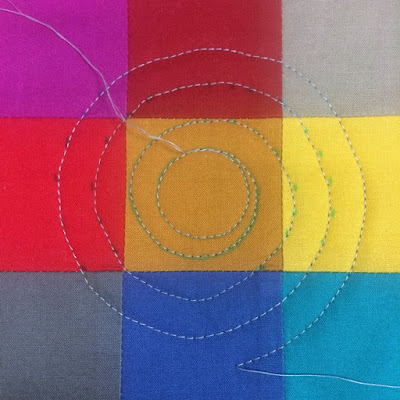 |
| Spiral quilting ultimately ripped out |
I decided to go with uneven concentric circles. And yes, that entailed burying the starts and stops of each circle. I found a
scrap booking circle template at the thrift store and used it to draw the circles. Sometimes I used a previously stitched line and the edge of my walking foot as a guide for the next line.
 |
| Sew Charmed under the machine |
Now the quilting is finished and I'm about to dunk it in the washing machine to remove the blue water soluble marking lines.
 |
| Sew charmed before soaking to remove the markings |
My favorite binding is double fold bias and liked the way it contrasted with vertical and horizontal gridded lines in the background fabric.
 |
| Sew Charmed by Paige Alexander |
Another view on the barn...
 |
| Sew Charmed by Paige Alexander on the barn |
And a view on the gate where you can see a little of the fall color.
 |
| Sew Charmed by Paige Alexander hanging on the gate |
Quilt Stats:
- Finished size: 27" x 20"
- Pattern: Inspired by Big Charming by Denyse Schmidt
- Binding: 1/4" double fold bias binding from 2" strips and sewn down by hand
- Fabrics: Michael Miller Cotton Couture mini charm squares; background: Grid by Bye Bye Birdie from Windham Fabrics
- Thread: Aurifil for piecing and quilting
- Batting: 100% Cotton Warm & White by the Warm Company
- Completed: October 30, 2015
Sew Charmed was a fun little quilt to make. So far, it has been my most liked
picture on Instagram and
most viewed on Flickr.
I didn't go back too far back in my quilty past to show you this one and am linking to
Throwback Thursday with Jen at
A Quarter Inch from the Edge.


